Time configuration
Adjust time zone
The local time zone can be set with a simple text based dialog:
dpkg-reconfigure tzdata
NTP time synchronisation
(To deepen see also: Wiki)
Remark: If you run a virtual server, any NTP time synchronisation is obsolete. You are not allowed to set the hardware clock and synchronisation (hopefully) is done by the provider on the host system. You can skip this configuration step if you are on a virtual server!
In most cases the package is already installed. If not:
apt-get install ntp
To safeguard the server against outages of a time server, usually three of them are configured. If your provider does not have pre-configured own NTP servers, in Germany for example the “Physikalisch-Technische Bundesanstalt” in Braunschweig provides time servers. You may find better time servers, which are less far away from you as Germany.
Therefor edit the file /etc/ntpsec/ntp.conf with the following three lines:
pool ptbtime1.ptb.de iburst
pool ptbtime2.ptb.de iburst
pool ptbtime3.ptb.de iburst
Restart of the NTP service as usual:
service ntp restart
One-time the correct system time should be enforced manually, as NTP avoids system time leap. Otherwise the time adjustment could take a long time, because NTP in this case runs the clock a little bit slower or faster for a long time span until the system time fits the real time.
service ntp stop
ntpd -q -g -x -n
service ntp start
Language configuration on the Server
(To deepen see also: Wiki)
Remark: If your desired language setting is “English (US)” and you do not want to change it, the rest of this page can be ignored.
First the package of the desired foreign language must be installed (here German as example).
apt-get install language-pack-de-base
The desired language settings can be adjusted in a simple text based dialog:
dpkg-reconfigure console-setup
Example: The following settings fit good for German.
– UTF-8
– Latin1 and Latin5 – western Europe and Turkic languages
– VGA
– 8×16
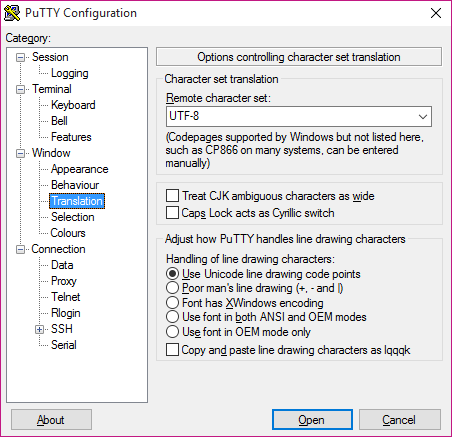
Language settings in PuTTY (Windows, optional)
Remark: Beginning with Windows 10 and on Linux no special tool for SSH is necessary. You can simply type something like ssh example@11.22.33.44 -p 12345 in the console window, where “example” means the user, “11.22.33.44” the IP or domain of your server and “-p 12345” the port if not default 22.
If PuTTY is used:
– Terminal/Keyboard: Function Keys and keypad: “Linux”
– Window/Translation: Character Set UTF-8
– Window/Translation: Handling of drawing characters: “Use Unicode line drawing…”
– Connection/Data: Terminal-type string: “linux”

Continued: Configuring the firewall