Configuring the firewall
The Yast-configurable SuseFirewall2 generates an opaque variety of filtering rules, but does not make it easy to close ports for connections coming from your own machine. OpenSim has to be classified insecure at the current state of development. Currently implementation of functionality and bug fixing simply has a higher priority over improving system security. Thus it is highly recommended to close all not necessarily needed ports for limited accounts. This makes it more difficult to use your server for attacks on third party systems … at least as long as the offender fails to gain root privileges.
For this reasons in this tutorial the firewall is configured, which is integrated in the linux kernel. We do not need additional tools. For this, as root three steps are necessary:
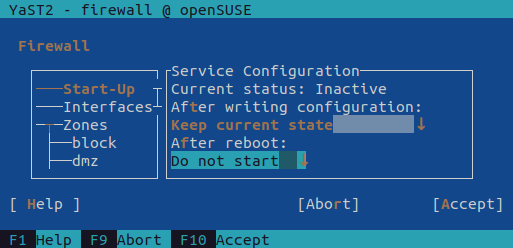
1) Disable SuseFirewall in Yast to prevent it from being started upon system reboot. “Security and Users -> Firewall”. If you get an error about missing parcels, likely the package SuSEfirewall2 is not installed so far. In this case of course there is no need to disable its start.
=> After reboot: “Do not start”
Reboot to disable the firewall before activating the other one in the next step.
2) Create the following bash script exclusively for root access (chmod 700), and place e.g. in the /rootdirectory. Here we will call it “firewall.sh”. The name is at will but must be the same as used later in the autostart service.
Remark: For SSH here is given the default Port 22, which was already changed in chapter “Hardening SSH” to another port. If already done, also in the firewall the modified port must be opened!
Remark: The name of the network interface depends on the system installation and must be adjusted! The ip addr command displays a list of available interfaces and lists the associated IP addresses for each interface. Exactly one interface has the externally accessible IPv4 address of the provider.
#!/bin/bash

# name of the network interface given by the provider
interface="eth0"

#### IPv6 configuration block ####

# delete all old rules
ip6tables -F
ip6tables -t nat -F

# close all ports
ip6tables -P INPUT DROP
ip6tables -P OUTPUT DROP
ip6tables -P FORWARD DROP

# allow local data traffic, necessary for the operating system!
ip6tables -A INPUT -i lo -j ACCEPT
ip6tables -A OUTPUT -o lo -j ACCEPT

#### IPv4 configuration block ####

# delete all old rules
iptables -F
iptables -t nat -F

# close all ports
iptables -P INPUT DROP
iptables -P OUTPUT DROP
iptables -P FORWARD DROP

# allow local data traffic, necessary for the operating system!
iptables -A INPUT -i lo -j ACCEPT
iptables -A OUTPUT -o lo -j ACCEPT

# special signals to manage IPv4 communication
iptables -A INPUT -p icmp --icmp-type destination-unreachable -j ACCEPT
iptables -A INPUT -p icmp --icmp-type echo-reply -j ACCEPT
iptables -A INPUT -p icmp --icmp-type echo-request -j ACCEPT
iptables -A INPUT -p icmp --icmp-type time-exceeded -j ACCEPT
iptables -A INPUT -p icmp --icmp-type parameter-problem -j ACCEPT
iptables -A INPUT -p icmp --icmp-type fragmentation-needed -j ACCEPT
iptables -A OUTPUT -p icmp -j ACCEPT

# allow answering on already existing connections
iptables -A INPUT -m conntrack --ctstate ESTABLISHED -j ACCEPT
iptables -A OUTPUT -m conntrack --ctstate ESTABLISHED -j ACCEPT

# allow outgoing TCP for all unprivileged Ports
iptables -A OUTPUT -o ${interface} -p tcp --dport 1024:65535 -m conntrack --ctstate NEW -j ACCEPT

# allow incoming SSH, optionally change port number (for remote maintenance)
iptables -A INPUT -i ${interface} -p tcp --dport 22 -m conntrack --ctstate NEW -j ACCEPT

# allow outgoing DNS (for solving domain names)
iptables -A OUTPUT -o ${interface} -p udp --dport 53 -m conntrack --ctstate NEW -j ACCEPT
iptables -A OUTPUT -o ${interface} -p tcp --dport 53 -m conntrack --ctstate NEW -j ACCEPT

# allow HTTP and HTTPS out (for software updates)
iptables -A OUTPUT -o ${interface} -p tcp --dport 80 -m conntrack --ctstate NEW -j ACCEPT
iptables -A OUTPUT -o ${interface} -p tcp --dport 443 -m conntrack --ctstate NEW -j ACCEPT

# allow outgoing NTP (for synchronizing with world time, obsolete in virtual servers)
iptables -A OUTPUT -o ${interface} -p udp --dport 123 -m conntrack --ctstate NEW -j ACCEPT

# Add here additional ports as required. Examples may be SSH und DNS. Adjust:
# => Direction "INPUT -i" (inward) or "OUTPUT -o" (outward)
# => Protocol "udp" or "tcp"
# => Portnumber

# own server (as defined in OpenSim.ini, default is 9000)
iptables -A INPUT -i ${interface} -p tcp --dport 9000 -m conntrack --ctstate NEW -j ACCEPT

# own regions (as defined in Regions.ini, one port per region)
iptables -A INPUT -i ${interface} -p udp --dport 9050 -m conntrack --ctstate NEW -j ACCEPT
2) Invocation of this script in the auto boot routine (already placed in there).
Own server: The port can be freely selected in the configuration file OpenSim.ini, default is 9000. If you run multiple instances of OpenSim on the same machine with a common IP address, select a separate port for each instance.
Own Regions: Each region needs its own UDP port as configured in the Regions.ini. Also with multiple instances of OpenSim on the same computer, there should be no overlap.
Caution! If after a reboot this script is not activated, your server runs without any protection. Hence it is highly recommended to have no services running which can be accessed from the outside Internet (apart from SSH), until the script is added to auto boot. Also do not forget to test the firewall!
Remark: Please prepare an up to date backup prior to working on firewall configuration. Start and test the firewall manually before adding it to system startup scripts. Misconfiguration on the firewall can lock you out from your server!
Backstop: Most server hosting companies however offer some means of web based configuration system where you can boot from a rescue system and mount your corrupted root file system to correct the settings. Check with your provider, if they offer similar support.
Remark: If you run other software besides OpenSim on the server, additional port shares may be required for the other software. For example, a common web server additional would require INPUT for the ports 80 and 443. It also makes sense to use IPv6 if a software can handle it.
Continued: Setup auto boot