Language configuration on the Server
Remark: In this example “German” has been selected as the desired language – please adapt to your requirement. If your language setting is “English (US)” and you do not want to change it, this Yast configuration step can be ignored.
In Yast choose “System -> Language”.
- In the Menu Primary Language choose your desired language.
- If the option Adapt Keyboard Layout is selectable, no cross may be set if you want to use the deadkeys option described below! (Not every language makes use of deadkeys.)
- If the option Adapt Time Zone to … is selectable, a cross can be set. However, this overwrites a possibly intentionally differently set time zone (see below).
- In the “Secondary Languages” list below, select English (US) in case no input window in your desired language is available.
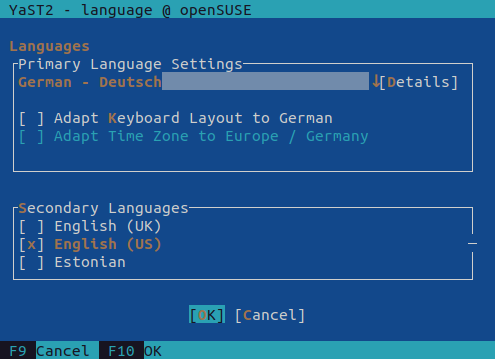
- Submenu “Details”: Check Use UTF-8 Encoding and select Detailed Locale Setting “de_DE” (or what is appropriate for your desired language).
After setting the display language, in most cases also the keyboard layout need to be adapted. Again in Yast choose “Hardware -> System Keyboard Layout”. In order to be able to set foreign-language accents such as à, ó, û etc. in German, you can select the option “with deadkeys”.
Finally doublecheck in the config file /etc/sysconfig/language and correct by hand if needed. Here an example for German in the fields RC_LANG and INSTALLED_LANGUAGES.
- RC_LANG=de_DE.UTF-8 (appropriate to your language)
- RC_LC_ALL=””
- RC_LC_…=”” (all empty)
- ROOT_USES_LANG=yes
- AUTO_DETECT_UTF8=no
- INSTALLED_LANGUAGES=de_DE,en_US (appropriate to your language)
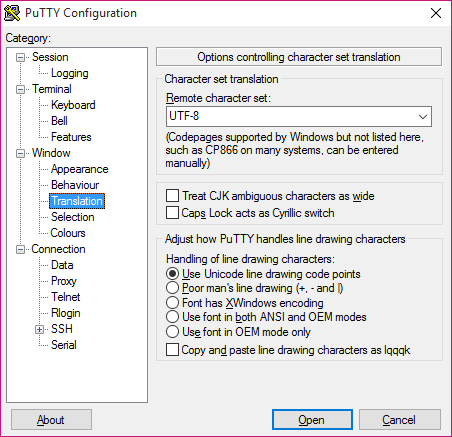
Language settings in PuTTY (Windows)
- Terminal/Keyboard: Function Keys and keypad: “Linux”
- Window/Translation: Character Set UTF-8
- Window/Translation: Handling of drawing characters: “Use Unicode line drawing…”
- Connection/Data: Terminal-type string: “linux”
Remark: On Linux no special tool for SSH is necessary. You can simply type something like ssh example@11.22.33.44 -p 12345 in the console window, where “example” means the user, “11.22.33.44” the IP or domain of your server and “-p 12345” the port (if not default 22).
Time configuration
Timezone settings
Open menu “System -> Date and Time”, to open the Clock and Timezone dialog. You can choose any time zone you want by selecting a region and a country. This may be overridden by the language setting if the offered time zone is ticked in the Adapt Time Zone field!
NTP time synchronisation
Remark: If you run a virtual server, any NTP time synchronisation is obsolete. You are not allowed to set the hardware clock and synchronisation (hopefully) is done by the provider on the host system. You can skip this configuration step if you are on a virtual server!
In the right bottom under “Date and Time” select [Other Settings…]. In the following dialog select:
- Synchronize with NTP Server
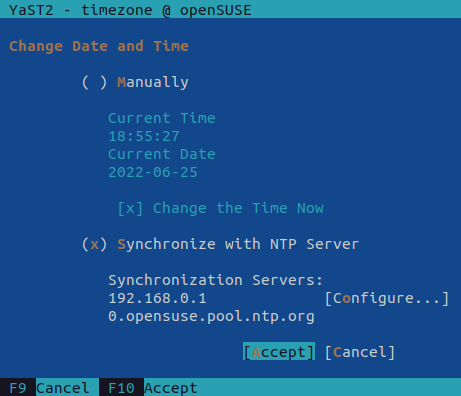
If you want to change the suggested NTP Server Address, choose a server pool address near to your country. With [Configure…] we step over to the NTP Configuration. In the top field (Start NTP Deamon) select “Now and on Boot”.
With OK (to leave the advanced dialog) and [Accept] the above selected configuration starts. Finally with another OK you leave the Clock and Time Zone dialog.
Continued: Manage user accounts and hardening SSH